
Vinyl flooring has become a popular choice among homeowners due to its durability, affordability, and ease of installation. This type of flooring is versatile, offering a wide range of designs that can mimic more expensive materials like hardwood or stone. In this article, we explore the essentials of vinyl flooring and provide a step-by-step guide on Todel flooring installation.
Understanding Vinyl Flooring
Vinyl flooring is made from synthetic materials, primarily polyvinyl chloride (PVC), which is processed to produce a soft, flexible, and resilient surface. It is available in sheets, tiles, or planks, with each format offering different aesthetics and installation methods. The two main types of vinyl flooring are:
- Luxury Vinyl Tile (LVT): LVT comes in tiles and planks and is known for its ability to realistically mimic natural materials. It is thicker than standard vinyl sheet flooring and often features a robust wear layer.
- Vinyl Sheet Flooring: This is often used in areas where water resistance is crucial, such as kitchens and bathrooms. Vinyl sheets are large and seamless, providing an excellent moisture barrier.
Benefits of Vinyl Flooring
Vinyl flooring is not only aesthetically versatile but also boasts several practical advantages:
- Durability: It is resistant to dents, scratches, and staining, making it ideal for high-traffic areas.
- Comfort: The softer surface reduces noise and is more comfortable underfoot than harder materials.
- Maintenance: Vinyl is easy to clean and requires minimal maintenance, needing only regular sweeping and occasional mopping.
- Water Resistance: Most vinyl flooring is completely waterproof, which is perfect for bathrooms and kitchens.
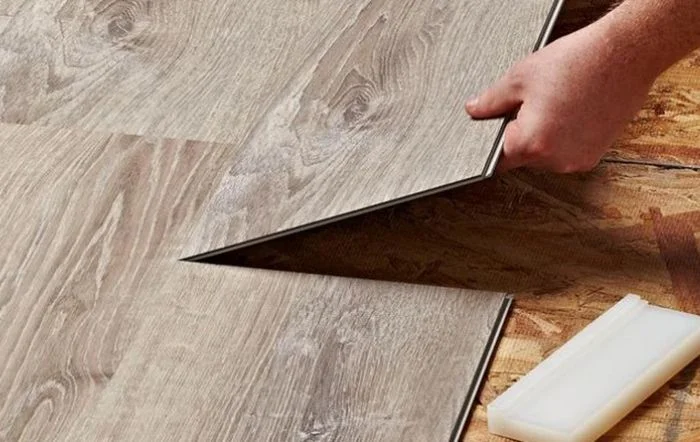
Todel Flooring Installation: Step-by-Step Guide
Installing vinyl flooring can be a DIY project if you have the right tools and a bit of know-how. Here’s how to install Todel vinyl flooring efficiently:
- Preparation:
- Remove any existing flooring and ensure the subfloor is clean, dry, and level. Imperfections can affect the final result, so consider using a self-leveling compound if necessary.
- Measuring and Cutting:
- Measure the room accurately and plan the layout to minimize waste and ensure the pattern matches up where necessary. Cut the vinyl according to your measurements, allowing a little extra for trimming.
- Adhesive Application:
- Depending on the type of vinyl, you may need an adhesive. Spread it evenly on the subfloor, or, if using self-adhesive tiles or planks, peel off the backing to reveal the glue.
- Installation:
- Start from the center of the room and work your way outwards, pressing down firmly on each piece to ensure good adhesion. Use a roller to eliminate air bubbles and secure the vinyl.
- Finishing Touches:
- Trim any excess material from the edges and install baseboards to cover the perimeter. Ensure all seams are sealed properly to prevent water ingress.
Conclusion
Vinyl flooring offers a practical and stylish flooring solution suitable for many areas of the home. With proper installation, like the Todel flooring installation method, your new floor will not only look great but also stand up to the demands of everyday life. Whether you choose sheets, tiles, or planks, vinyl flooring can provide a long-lasting and attractive finish to any room.